Friday, December 19, 2008

How to convert DVD to 3gp proper way - 3rd part: External subtitles

In the previous post we burned-in the subtitles, that we got directly from the DVD video files. This time we'll make a .3gp movie with embedded external subtitles, that we got with SubRip (see the step 2 in this post).
By using external subtitles we can place the subtitles much easier and precisely into the movie, and we can choose some setting that we can't with internal subtitles (font, outline width, shadow depth etc.).

Make everything from the previous post, from steps 1-13.

14. Add subtitle with "TexSub 2.23" filter. Open subtitles (most likely .ssa file), and click "Styles":


15. Set the values like you want, I found the following setting the best for my taste:
 

Font settings:

16. Filter list now looks something like that:

17. Again check the settings in the output movie in the main VirtualDub window:


That's it. Now go through the steps 14-17 from this post: set the start end the end of the movie, start frameserver, and encode the video using ffmpeg with 2 passes.

Final result on my Nokia:
 
 Compared with the movie, where we used internal subtiles with custom colors:
  

Thursday, December 18, 2008

How to convert DVD to 3gp proper way - 2nd part: Subtitles

Make everything from previous post, from point 1-9.

Just to explain shortly, what we'll do in the following steps. This is what we have:
And this is what we want:

The movie is again 320px * 176px, this time we'll put one line of the subtitles in the bottom black border. With this settings my Nokia movie player displays the same size video as in the previous post. And in the no-fullscreen mode the the video is not shrinked. Plus the final height 192px is multiple of 16.

This can probably be done in different ways, this is how I do it. If you think you have better/quicker solution, leave a comment.

10. Add "Null transform" filter, click "Cropping" and remove the top and the bottom black border:

11. Add "resize" filter with the following settings:

12. Add another "resize" filter with the following settings:

13. Add "Null transform" filter, click "Cropping" and remove 16px tall belt from the top :

14. Now we'll add subtitles with "VobSub 2.23" filter:

15. Select "Open", browse to the folder, where you have DVD files, select "Ifo and Vobs, for creating idx/sub" filetype, and open correct IFO file (e.g. if you selected VTS_02_1.VOB in the 3rd step, now select VTS_02_0.IFO - names can be quite confusing):

16. Select the folder, where you want to save extracted subtitles. Choose "c:\movies"

16. On the upper right window select subtitles, that you don't want, and click the second button in the middle from the top, to remove them from list. Click OK:

17. VobSub will now extract all subtitles in the chosen language, and will save them in the index file (.idx) and .sub file, which contains bitmaps of the subtitles (don't mix that with theMicro DVD Player subtitle file format):

18. Now choose the right size and the position of the subtitles. This can be quite time consuming, trial&error will probably do the trick. Set the parameters and click OK till the main VirtualDub window, use the time slider and check the position of the subtitles in the output movie:


Now go through the steps 14-17 from the previous post: set the start end the end of the movie, start frameserver, and encode the video using ffmpeg with 2 passes.


This is how the final product looks on my Nokia:

Fullscreen playback:

Edit 2008-12-23: By choosing different colors of the subtitles you can influence on the sharpness of the subtitles. In the VobSub filter settings check "Custom colors" and set the colors as you like. Maybe the self explanatory picture below will help you:

With the settings above the movie looks like this:

How to convert DVD to 3gp proper way - 2nd part: No subtitles

Prepare everything as explained in the previous post.

1. Optional & highly recommended: Copy DVD files to the hard drive, eg. to the "c:\movies folder".
Tool: DVDDecrypter (use file mode)
2. Run VirtualDub, File->Open video file...
3. Browse to the folder where you extracted DVD files (e.g. "c:\movies"), view files in detailed view, sort by name, and select the first file of the biggest .VOB file set. Also check "Ask for extended options after this dialog":

4. Check "Open multiple VOB files as one virtual file"

5. In the Open Multiple VOBs click OK, and wait, until the MPEG-2 plugin parses the files (a minute or two)

6. In the Audio menu select "Direct stream copy" and choose the correct Audio stream (in this example only one audio stream was available):

7. In the Video menu, select "Full processing mode" and then click on Filters (CTRL+F)
8. Click "Add", choose "resize", and click OK:

9. Select "Compute hight from ratio" and type in 16 and 9, click OK

10. Just to clear up things what we'll do in the following step. This is what we have:
and this is what we want:
Sizes 320px and 176px are both multiples of 16, which is apparently good for mpeg4 encoding.

Add another filter, this time "Null transform", and click "Cropping"

11. Use the slider to find some bright scene, and drag the top and the bottom border to remove black fields at the top and the bottom of the movie
12. Add another "Resize" filter, this time type in just the following parameters:

13. Check the output video in the main VirtualDub window, it should be something like that: (on the left is the input video, on the right is the output video; don't bother about that green thing on this picture, it has to do something with the screen capturing and video memory I guess)
Make sure you have appropriate aspect ratio (scroll to some scene with round object like the moon or the sun, and make sure, it's really round).

14. Use the "Mark-in" and "Mark-out" buttons to select where you want your final movie (.3gp) to begin, and where do you want it to end. This way you can remove the opening and the closing credits from the movie:

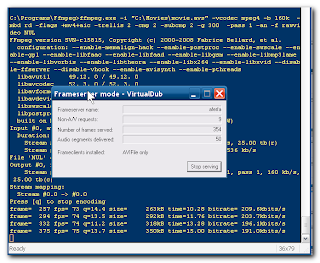
15. In the "File" menu click "Start frame server":

16. use some unique name for the Frameserver name, it doesn't really matter what you type, you can also leave it default:

17. Save that "dummy" file as "c:\movies\movie.avi":
That file name must be the same as in the movie.avs file, which we have prepared in the previous post. This .avi file is not really an .avi file, through this file VirtualDub just "serves frames" to the program that opens this file (like some kind of server).

18. Now open your favorite command shell, also START->run->cmd will do. Run the following command:

c:\programs\ffmpeg\ffmpeg.exe -i "c:\movies\movie.avs" -vcodec mpeg4 -b 160k -mbd rd -flags +mv4+aic -trellis 2 -cmp 2 -subcmp 2 -g 300 -pass 1 -an -y -f rawvideo NUL


Short explanation: First pass, no audio, according to this and this the following options are the best for mpeg4 video. But don't ask me, I have no clue what they mean. This first pass should finish in less than one hour on a fairly new computer.
Make sure you use input file movie.avs, not movie.avi, since ffmpeg can't handle VirtualDub frameserver file. This .avs file is again some kind of proxy, this time from Avisynth, and ffmpeg recognizes avisynth file. With this "almost hack" you can serve ffmpeg with VirtualDub frameserver.

When the job finishes, run another pass:
c:\programs\ffmpeg\ffmpeg.exe -i "c:\movies\movie.avs" -vcodec mpeg4 -b 160k -mbd rd -flags +mv4+aic -trellis 2 -cmp 2 -subcmp 2 -g 300 -pass 2 -acodec libfaac -ac 2 -ar 32000 -ab 88k -f 3gp c:\movies\movie.3gp

This second pass takes longer to finish, about an hour or two. If you don't mind about the quality you can run just one pass - use the above command, just remove option "-pass 2" (you can also remove options -mbd, -flags, -trellis, -cmp, -subcmp, -g, if you prefer that way).

With this settings 1hr of the movie takes around 110MB. If you like, you can choose some other settings for video bitrate (-b), audio bitrate (-ab) and audio sampling rate (-ab). With the settings above the sound quality is really good. You can also try some other sound settings. See the table below for the final size (in MB) of 1.5h movie, with 160kb video rate, and different audio bitrates (first column) and sampling rates (first row), results may vary:


That's it, now you can transfer movie.3gp to your mobile phone and watch your favorite movie, if your wife doesn't let you have the remote for your brand new FullHD TV (dream on, baby!) ;-). This is how it looks on my Nokia:
Fullscreen playback:

Wednesday, December 17, 2008

How to convert DVD to 3gp proper way - 1st part: preparation

This and this tutorial sucks. Although they produce decent results, the way is much too complicated. I found much simpler way how to do it, and will post this tutorial in several posts. In this first post in this series we'll prepare everything for real actions.

Make 2 folders, "c:\movies" (where all movie related files will be), and "c:\programs", where we'll put some programs.

Now download the following:
- virtualdub and extract the files into "c:\programs\virtualdub"
- MPEG2 plugin for virtualdub and extract MPEG2.vdplugin into "c:\programs\virtualdub\plugins"
- AC3 plugin for wirtualdub and extract AC3.vdplugin into "c:\programs\virtualdub\plugins"
- ffmpeg and extract it to "c:\programs\ffmpeg"
- avisynth and install it
- optional: DVDDecrypter and install it
- vobsub and install it. Choose custom install and check the settings like in the picture below:


If you'll ge a prompt about virtualdub install folder, choose/type "c:\programs\virtualdub"

- now make a text file c:\movies\movie.avs, with the following content:

AVISource("C:\Movies\movie.avi")


Just one more thing to do: run "c:\programs\virtualdub\auxsetup.exe", click "Install handler" and "OK".

Wednesday, December 10, 2008

How to convert DVD to .3gp with embedded subtitles

This is a continuation of this story, except the final product will have embedded subtitles, big enough to read on mobile phone display. Since I don't really have time to explain everything, I'll just post some pictures. If there we'll be some requests to explain in details, I could change my mind.

1. Remove opening & closing credits from the movie. Tool: DVDShrink


2. Extract subtitles from the movie and covert them to .ssa format. Tool: subrip


3. Convert video to .avi with embedded subtitles. Tool: autogk

To get the "External subs" field press CTRL+F8

In the main windows, click "Add Job" and then "Start"

4. Convert .avi to .3gp. Tool: ffmpeg.exe

>ffmpeg.exe -i c:\Movies\Movie.avi -vcodec mpeg4 -b 144k -bitexact
-hq -acodec aac -ac 2 -ar 24000 -ab 24k -f 3gp c:\Movies\movie.3gp


5. Final product: